Game Play: Musket and Pike
So I mentioned I did some pike pushing last weekend.
The game in question is entitled This Accursed Civil War, designed by Ben Hull and published by GMT Games. The box contains maps and counters for playing five battles from the English Civil War. This Accursed Civil War is itself part of a series of games entitled the Musket and Pike Battles Series. Other games in the series cover battles from the 30 Years War on the continent, a conflict characterized by the technological transition from armies with long, pointy sticks to armies with gunpowder weapons. Hence the title, Musket and Pike.
The series concept is worth a note or two. As I’ve previously suggested, learning rules is probably the single biggest impediment to the actual play of board wargames. With series games, however, you have a common rules set that is applicable to multiple titles in the series. Having learned the Musket and Pike rules and owning all four games in the series, there are about 20 different battles I can play right out of the box. Some readers will recognize this as an expansion of the old SPI concept of the quadrigame, which also used a common rules set to play four different games all packaged together. Relying on a single rules set to cover diverse situations can sometimes straightjacket a designer, but the format also allows for a page or two of game-specific rules that apply only to the battle at hand.
The idea of gaming a “battle” is also worth a mention. As I’ve also noted elsewhere, wargames come in several different scales. Rather than gaming a particular battle, I could have opted to play a game that would cover the entire English Civil War. The battle game is the mainstay of the hobby, however; sometimes referred to as “grand tactical” level games, the appeal is that you have a well circumscribed historical event and the player has a clear role to occupy, namely that of the army commander.
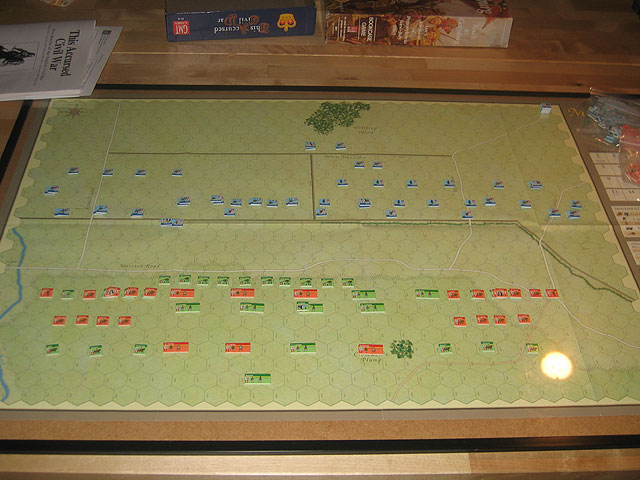
The battle we played was Marston Moor, the largest and bloodiest fight of the English Civil War, featuring a mixed force of Parliamentarians and their Scots allies against a Royalist army under Prince Rupert outside of York. See Wikipedia for more of the history. Here’s how the game looks set up; the Royalists are in blue, the Parliamenterians in red, and the Scots in green:
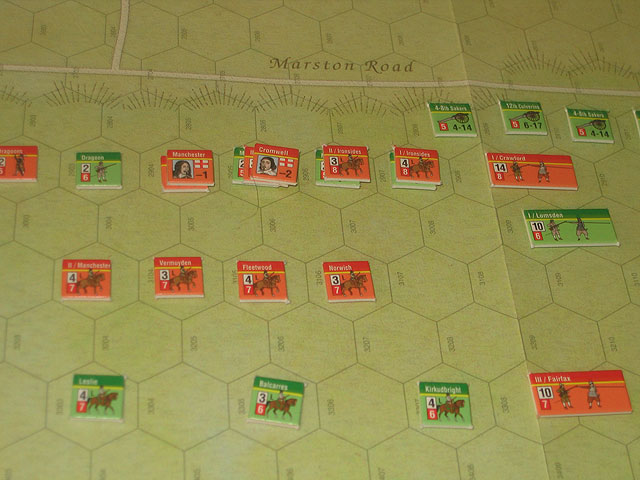
And here’s a close up of the Parliamentarian cavalry wing under the command of one Oliver Cromwell:
Because the armies of the day needed open ground to deploy effectively, most battlefields in this period were anonymous open terrain. There were no inherent geographical objectives, nor were the battles themselves subtle affairs; the objective was typically to drive the enemy from the field and one did this by killing. Here the only terrain feature of note is the hedge which affords a portion of the Royalist line some scant cover. One wins the game by inflicting casualties on the enemy.
What’s subtle is the actual game play, or as a tactician might put it, “battle management.” Here’s also where the current state of the art in game design becomes visible. Were this an old style SPI wargame, such as the once very popular 30 Years War Quad, each player would be free to move all of his units every turn in whatever manner he wished, subject only to the limitations of terrain and the presence of the enemy. Units would engage in combat until eliminated, and units would perform at peek effectiveness until eliminated. The player enjoyed an omniscient perspective on the proceedings and was free to act on it.
Here, however, things work differently. As was the case historically, these cardboard armies are divided into “wings,” left, center, and right. In this era one typically had a heavy infantry center, and cavalry on either wing. The game system mandates that each wing always be in one of four Orders States: Charge, Make Ready, Receive Charge, and Rally. Each Orders State comes with inherent constraints that dictate a unit’s offensive and defensive capabilities. Changing from one Orders State to another is the job of the Wing Commanders, who are represented by counters rated for their historical performance. Thus Cromwell will prove much more adept at changing orders for his wing than another, more mediocre commander on the field. (The success or failure of the actual orders change is resolved by a die roll, modified for various factors.) Note that the player’s authority is here being dispersed among his cardboard representatives; as Army Commander, you might spot a perfect opportunity for your cavalry wing to charge, but if the Wing Commander can’t convert orders from Make Ready the rules will forbid engagement with the enemy. What we have then, is fog of war via procedural abstraction—the game system willfully imposes friction on a player’s ability to operate in an effort to model a variety of battlefield effects that would impinge on the abilities of a real commander, everything from a bumbling performance by subordinate to literally being unable to see through the thick powder smoke.
Most armchair generals will drive their cardboard troops relentlessly; this often produces a-historical results, because it allows an army to fight to the last man. Thus the critique that a game system is too bloody is one of the most common in wargaming. Far from being a hawkish virtue, a “bloody” system means that the game produces too many casualties, typically because the armchair generals are using their troops in a way that no historical commander ever could or would. At Marston Moor there were about 4000 casualties in some two hours of fighting, extreme by the standards of the day. A good recreation of the battle should produce about the same loss rates. A good game system thus reflects the way a unit gradually looses effectiveness over the course of an engagement. Musket and Pike actually tracks a unit’s current effectiveness on three separate vectors: formation, morale, and casualties. Mechanically this is done by placing marker counters on top of or underneath the individual unit.
It is extremely rare in Musket and Pike for a unit to dwindle away to nothing through actual casualties received. Typically, what happens is that the unit’s morale—an abstract representation of its will to fight—degrades until it eventually “breaks” and retreats (“routs”) from the combat, regardless of the wishes of the player. Likewise, given that the armies of the day required tight, disciplined formations to fight effectively, the game system tracks the deterioration of ranks through movement over difficult terrain, contact with the enemy, and other debilitating effects. Formation and to some extent unit morale, though never actual casualties, can be restored through Rally actions, but this involves pulling units out of the fight and giving them time to recover. Hence battle management, that is managing your martial resources by feeding fresh troops into the fray in order to maintain pressure on the enemy. Musket and Pike battles are typically won when one player is able to break the other’s battle management cycle, that is inflict losses faster than his opponent is able to recover from them, eventually causing their position to collapse, at which point the army will rout and cede the field.
In the actual game, I had the Parliamentarian allies. After an ineffectual artillery barrage my heavy infantry center lurched forward, a couple of formations foundering due to the enemy guns, but if there’s one thing the Roundheads have in this scenario it’s heavy infantry. The real action, though was over on my left, where I activated Cromwell’s cavalry wing. Despite managing to get Cromwell himself killed early on I pretty much pulverized my opponent’s right wing and was able to turn the whole flank. The constraints of the orders system meant he couldn’t get his guys out of Receive Charge to redeploy and meet the threat. The Allies achieved a decisive victory, dear old Cromwell fertilizing the daisies notwithstanding.
Stephen Ramsay said,
February 10, 2007 at 6:03 pm
“. . . everything from a bumbling performance by subordinate to literally being unable to see through the thick powder smoke.”
Fascinating. I imagine this was a huge problem in early warfare, when the “signal corp” consisted of a bunch of teenage boys with flags and trumpets. You could very well miss the order to retreat or flank left because you couldn’t see the flag bearer twenty-five feet from where you were standing.
What Cromwell wouldn’t have given for a GPS receiver!
Michael said,
June 15, 2008 at 4:16 am
Thanks for this review; we just played TACW and this very battle the other night. My cavaliers traded horse for horse and then my infantry got steamrolled, no thanks to my cannons’ cross-eyed crews missing every die roll.
I do like the fog-of-war and the degradation of units, and hence the need for caution and reserves; but I found it really slow going until we had the rules down cold. Also, I wish the counters and hexes were bigger, as all those markers/chads really clutter the board up, and slow things down.
Do you recommend any other games in this series? I only have this one.
Matthew said,
June 15, 2008 at 8:13 am
Glad to hear you enjoyed it, Michael. I think all the games in the series are worth getting. It mostly depends on which battles interest you from a historical standpoint. All things being equal, I’d say go with Gustav Adolph the Great (which will also give you an alternative version of Edgehill).